Monday, January 18, 2010

Play Room Clip Art Rail

It was through Kari at UCreate that I found Ana at Knock Off Wood when she featured this project:

Creative Guest: Knock-Off Wood {Clip Art Rails Tutorial}

I picked up the 1x2 for less than $5 at Lowes, everything else I had on hand to fix up this bare wall in the kids playroom:


Ana's tutorial is much better, but in case you are interested, here is how I did it.

Materials:
  • 1 length of 1x2" pine
  • 2 handfuls of clothes pins
  • Spray paint
  • Gorilla Glue
Ok - so first I measured and cut the 1x2" to 80" which was about 4" shorter than the wall.

Then I painted it black to match the bookcase and frames in the room.


I took apart the clothes pins and spray painted them silver (the color of metals in the room, the lamp the storage stuff in my craft area.)


And then I had to put those little suckers back together which I've got to tell you is NOT easy.


I was going to decoupage the clips, like I did back in November but then decided I liked them plain.


Next up - affixing the clothes pins to the 1x2 - I decided to use Gorilla glue rather than screwing them into the rail, the stuff worked really well on the bunk bed book shelves and I've got plenty left over.


Once the Gorilla Glue had dried, we simply used dry screws to attach it directly into the studs.


(That is the back of my husband - I don't have quite the muscle to counter sink the dry wall screws into the studs... had to bring in the muscle.)

And here is the finished rail:


More tomorrow on what we've done with it... stay tuned.


Sunday, January 17, 2010

We're Casing the Joint...

Book Casing that is.

We're in the midst of building our first piece from the amazing site Knock Off Wood. If you've not browsed her site, go now, I'll wait for you to get back.

Can you believe her???

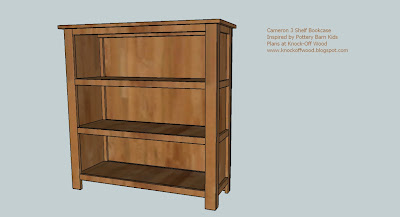
I've considered myself pretty fearless when it comes to home improvement, decorating, crafting and what not but Ana takes it to a whole new level.  And thanks to her doing so, I've got a whole new obsession. I've got a bookmark file a mile long of her projects that I want to tackle. But for now, we're starting with this: The Cameron Bookcase.


 (Image Source: knockoffwood.blogspot.com)

We've been looking for a bookcase for the odd space on the main level of our house where the down stairs go down, the stairs up, go (surprise surprise) up and the bathroom, living room and family room all come together. I've found a variety of solutions, ranging from $150-$700. I just couldn't justify that cost.

We've already gotten started, and I am trilled to say that the supplies for this came in just under $70.00 not including paint (because I have no idea how I'm going to finish it just yet.)

I'll be documenting the process of pulling this off here, and here is what I've learned already - I'm so happy that my husband wanted to cut the big pieces for this. In theory, I could have done it, but I really didn't want to. We work so well on projects together and I was thankful to him manning the band saw while I was cutting the 1x2's and 1x3's on our miter saw.

Couple of other things:
  • I'm making it just a little wider, 4" wider. Otherwise it would have pissed me off forever that I made a bookcase and didn't get EXACTLY what I wanted.
  • For that reason, or maybe not, I needed 7 lengths of the 1"x2" rather than 6. (Wish I realized that while I was at Lowe's. I'll be going back tomorrow for the last piece.)
  • And more importantly, on the cutting diagram that Ana's shows. There are 2 shelf pieces at 11.5x37" and the cutting instructions it asks for 3. The cutting list is right, you'll need 3, not 2. 
  • READ all of Ana's instructions before going shopping, trust me, she's got notes in there that will make you happy you read everything first.
  • We're toying with the idea of adding doors to the top shelf to hide some of the clutter. Not sure about it... but thinking of it.
So, stay tuned. All but 2 of the pieces for this are cut and waiting for me in the garage. I've got the day off and hope to devote some time to sanding everything and maybe, just maybe putting it together.

Wednesday, January 13, 2010

Lost in Translations (or Silhouettes to the rest of the world.)

Ok, so to most people, these are silhouettes, but in design school we worked on something very similar that our profession called "graphic translations" not silhouettes. It turned out to be one of my favorite projects that year and I went on to work with them on my own.

For most of last year I was obsessed with silhouettes, we had them cut of the kids in the spring and they have been a favorite of mine. I just love them.


These are the real deal - hand cut, from live models, not from a photo, not painted, not on the computer. Such a talent!!!

I've taken advantage of these by turning them into Christmas Ornaments this year. The obsession hasn't gone away. In fact it has gotten worse. I'm a woman obsessed.

And I do believe I've found a way to channel that obsession. By feeding it.

My girlfriend Kim has an amazing lovely, amazingly talented daughter. (Well actually, she has 3 of them, so much talent in one family - She and her husband know how to nurture these girls so their abilities shine.) Their oldest girl is who inspired me with this project, she is a dancer.

I took this photo that Kim had of her:


(The girl takes my breath away...)

And I imported that picture into illustrator where I outlined it.


With this I wanted to remain true to the art of hand cut Silhouettes by not piecing it together, I kept a continuous line so that when cut, it would be 1 piece. That involved a bit of trouble shooting but I got it work.

I then took the outlines into a 12x12 illustrator document and sized them to a variety of sizes.


I exported this file as an SVG that I opened in SCAL and cut on my Cricut on black paper. Finally I mounted them on white paper... and forgive my AWFUL picture, I should be ashamed of showing such an amazing project with such an awful picture but I'm impatient like that. I promise better photos soon.


So now I've got a file that I can use cut silhouettes of this amazing dancer at pretty much any size, on any material.

This project has brought me such joy, it is the blend of so many of my passions, design (using illustrator), crafting (using the circut & finishing the pieces), kids and celebrating them...


I'm really hoping this is going to open the door for something new, custom silhouettes.

Linking up to "Make Your Monday" at Twice Remembered and Saturday Nite Special at Funky Junk Interiors. 

Tuesday, January 12, 2010

Snowflake Vases

I've been enamored with snowflakes lately. The hand cut ones that all did in elementary school. I've got the cricut, I could cut a million of fancy ones, but for some reason, I love the hand cut ones.

I needed something to replace the ornaments in the hurricane vases that we got for the mantle.


So I cut some snowflakes and put them inside the vase:


It didn't turn out quite like I'd hoped it would, but better than an empty vase.

Monday, January 11, 2010

Valentine's Wreath

As soon as I saw this wreath at Living with Lindsey I knew I wanted to do it.

Unfortunately for me, while I had about a million yards of pink chambray fabric, Micheals didn't have the heart form that I needed for it, a few phone calls later, no one did. Bummer...

So I had to improvise, here is what I used:
Pictured are:
  • Foam wreath form, circular
  • Cardboard heart
  • TONS of pink chambray fabric, also some green - but I didn't use it. 
  • Scrapbook paper
  • School glue
  • Modge podge
  • A pencil and a foam brush.
I pretty much followed her instructions, so I'll leave the step by step to ladies at Little Birdie Secrets. But a few things about my wreath that I wanted to point out...

The Chambray Fabric - chambray fabric is really cool for this because while from a distance the fabric looks like 1 color, it is made up of 2 different threads. The warp threads are a bright raspberry color, the weft threads are white, so when it frays, you see the individual threads not just the finished color.

See:

In order to make the fraying easier, I didn't cut the squares of fabric, I snipped a bit, and then tore it... there ended up being threads everywhere. So when people in our neighborhood see birds nests in raspberry and white, that will be why.

I also used larger squares and packed them REALLY dense.


After I finished the wreath, which did take a lot longer than I expect... I tore up a bunch of the scrapbook paper and decoupaged the heart.

And here is the finished wreath!


What I really like about this solution, because it isn't a heart and it isn't red, on February 15th, I can just pull out the decoupaged heart and I've got a spring wreath... I can add whatever I want, whenever I want to change it up.

Here are a few more detail pictures:
 
And I'll admit, even though this is supposed to be on our front door, it is in the family room... I can't give it up yet and want to see more of it than I will on my front door.


Sunday, January 10, 2010

Letter Plates

I gave you a sneak peak of these last week...

We've got a plate rack in our dinning room that was a gift from my husband for our first Christmas in this house. Throughout the year I put different plates in it depending on the season, here is what we do at Christmas:


But I don't have any plates that we just generally use that aren't seasonally specific. I decided I wanted to do something with my cricut... I thought I wanted to do each of our monograms, there were room for 4 plates, we have 4 people. Perfect.

Until I started working with the monograms and just didn't like the way they were turning out.

But then I decided to just do our first initials because the monograms had so many common letters but our first names are all different. I created the artwork in illustrator and saved the file as an SVG to open in Sure Cuts A Lot and then cut with black vinyl on the cricut.

Here are the materials I started with:


Pictured are:
  • My cricut expression
  • Netbook with Sure Cuts A Lot software
  • 12"x24" matte for the cricut
  • 4 dinner plates
  • 12"x24" sheet of black vinyl.
  • Contact paper to transfer the vinyl from the backing paper, to the plate
  • Cricut tools including a spatula to lift the cut vinyl and a popsicle stick to burnish.
Step 1 was to open the file I created in Illustrator into Sure Cuts A Lot.


 Step 2 - Cut the Vinyl and then remove the portion that you do not want to transfer to the plate.


Step 3 - Cut a piece of contact paper and place on top of the letters and then use the popsicle stick to burnish over the letter to help get them stuck to the contact paper and give up the backing paper.


Step 4 - Gently pull up the contact paper making sure all the vinyl letters come with you. If not, put the contact paper down and burnish again.


Step 5 - Position the contact paper with the cut letters over top of the plate and then burnish over the letters again.


Step 6 - Peel up the contact paper and you've got yourself a decorative* plate!!!


Here is the plate rack with the finished collection of plates:


And close ups of each of our plates:


I'm beyond thrilled with how these have turned out and I really enjoyed the process of making them... I'm toying with the idea of refining my process and selling them. You may notice that I still have a lot to learn. Some of the fonts I picked really didn't work with some of the letters and I had to pull them off... but not one else, well, except you - know that.


*note, these are DECORATIVE plates, they shouldn't be used to eat off of, serve food from, submerged in water or put in the dish washer. 


Friday, January 8, 2010

Please don't make me twitch.

Ok - I'm new at the blog thing, we know that... I think it is rather obvious.

But, what I am not new to is creating graphics for the web. I've been doing that since 1995. And for you younguns out there, yes, the web has been around that long.

I've got a favor for you out there in blog land... PLEASE don't upload graphics to your blog that are HUGE. They take forever to display, choke my connection and make it very difficult to visit ya'll on my lunch hour.

Especially for your core blog graphics like your background, header, buttons and such. If any of them are over 100k - you need to change your file type, your resolution, your optimization... something... anything to get that sucker below 100k. I ran into a graphic the other day that was 800k. On a slowish cable connection that is going to take almost a full minute to display, even a best case with a fast connection I'm still waiting 10 seconds or more.

I like to use bigger pictures for my projects to people can click on them and see them in more detail and I appreciate it when others do the same... but even those shouldn't go over 300k.

So please... don't make me twitch, and if you need help optimizing your graphics let me know.

Thursday, January 7, 2010

I'm not sure where to start...

with this project...

My mom gave me the campaign chest that belonged to my grandparents. It is in need of some TLC and I have no idea where to start. For now, I'm just enjoying having it. It fits perfectly in our foyer, like the space and the chest were destined to come together.


I love the coloring of it, I don't want to paint it (I know my grandfather would roll over in his grave if I did...). I just want to to do what I can to help it look as good as it can.

One thing I know I won't change, the lining of the drawers.


It is the wallpaper that my grandmother used in their home that I loved so much, and still miss. It's funny, I don't remember the wallpaper, it makes me sad that I don't. Each year goes by and memories fade.

But I'm so happy to have this piece in our home. I'll cherish it always.

Wednesday, January 6, 2010

Sneak Peak

I'm working on a project that I'm really excited about... Here is a sneak peak.


Tuesday, January 5, 2010

Benches Rule!!!

When we replaced the kitchen table in the fall, the table was the point... But what we've come to REALLY appreciate are the benches.


We've gone from being able to seat 4, sometimes 6 if you borrow chairs from the dinning room, 8 if you add the leaf AND drag 4 chairs out of the dinning room to being able to enjoy dinner as a family of 4, and host a slew of friends without changing a thing. We actually had 9 around our table the other day.

NINE!!!


2 in chairs, 4 on one side, 3 on the other... AMAZING!
Related Posts with Thumbnails