Here it is, part 2 of Handmade Holidays - this time, Holiday Coasters as inspired by Traci at
Beneath My Heart.
It was this project that sent me on my quest at the
ReStore on Wednesday. I was on the prowl for the perfect tiles to turn into coasters. This first set is more of a joke and a way to test out the process and materials for some other ideas that I've got spinning in my crazy little head.
And here are the tiles I found:
The picture doesn't do them justice (my photos never do... ugh.) They are Italian Glazed Porcelain Tiles and they are fabulous... and for $.20 each, they are super fabulous. These are brand new, amazing tiles... for a fraction of the cost of plain tiles anywhere else. See, this is why I love the ReStore and I'm so happy they've opened a new one near my house!!!
So, here are the supplies:
- 4 Tiles $0.80
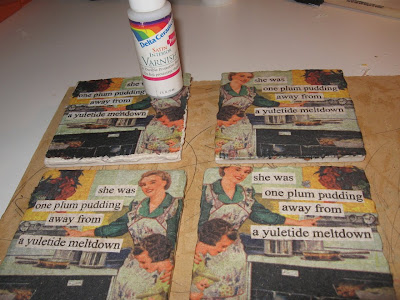
- A cocktail napkin, free, part of a gift from a few years ago. They say "She was one plum pudding away from a yuletide meltdown."
- Heavy duty felt pads $5 for 48, I used 16 so I guess that makes the cost around $1.70 for the set.
- And of course, modge podge and some varnish.
So that makes the total cost for a set of 4 coasters $2.60. Seriously??? That seems criminal.
First, I cut the napkin into 4 pieces. on one of the coasters I used deckle snips to give the edge some texture. That is my least favorite coaster now so I don't recommend it.
Next, I applied some modge podge to the surface of the tiles:
(My daughter wanted to help by taking pictures... I should have her take all my pictures, these look better than mine usually do.)
Then I applied the napkin to the surface, but given how delicate the napkins were, I did NOT apply a coat of modge podge on top of the napkin. I just pressed it down with a foam brush to get it into the crevices of the tile. (See there is that darn deckle edge that I don't like)
After the modge podge had dried I followed up with several coats of satin varnish.
(See how much better the other edges look, just torn and wrapped around rather than deckled. - I just can't let it go.)
And finally, the felt pads in each of the corners, trying to avoid the ridges in the back of the tile... in hindsight I'm not sure I needed to do that.
And here is the finished coaster...
The next stop for these is my office where they are going to be abused by me and my coworkers to determine how practical these are and how much wear and tear they can withstand... do they need more varnish, did I use too much and drinks slip off.
I've got quite a plan for a lot of gifts based on this experiment and a box of 54 more tiles waiting to learn the results.


